BCLinux oe21.10 安装记录

一、概述

移动云的软件源站点是:https://mirrors.cmecloud.cn,提供了一些基础的软件,包括BCLinux。
BCLinux的镜像地址为:https://mirrors.cmecloud.cn/bclinux/

mirrors.bclinux.org是同源域名,yum repolist 内部是这个域名

1. 版本规划

作为Linux的发行版,BCLinux 有两个完全不同的技术路线,早期的版本是基于 Centos 定制化,包括:

  • V7: 基于 Centos 7,目前包含 v7.8,仅提供x86架构
  • V8: 基于 Centos 8,目前包含 v8.2、v8.2、v8.6,仅提供 x86 架构

随着 Centos 停服日期的迫近,以及自主可控操作系统的要求,BCLinux 转向了 OpenEuler,包括:

  • oe1: 基于 OpenEuler 20.12,仅提供ARM64架构
  • oe21.10: 基于 OpenEuler 21.10 和 21.10U3,提供 x86 和 ARM64 架构
  • oe22.10: 基于 OpenEuler 22.10 和 22.10U1,提供 x86 和 ARM64 架构

目前 BCLinux 的版本生命周期的规划如下:
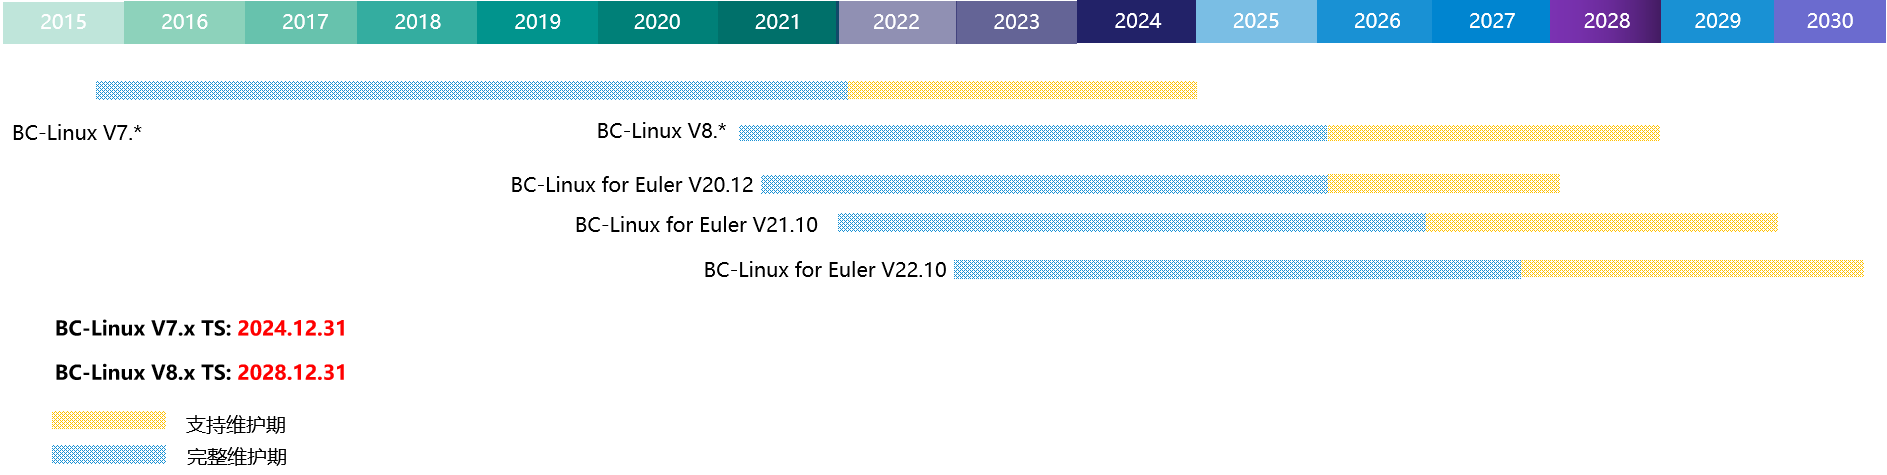
版本计划

2. 与 open Euler 的关系

尽管目前的 BCLinux 是基于 openEuler 的定制化版本,但也存在明显的差异。
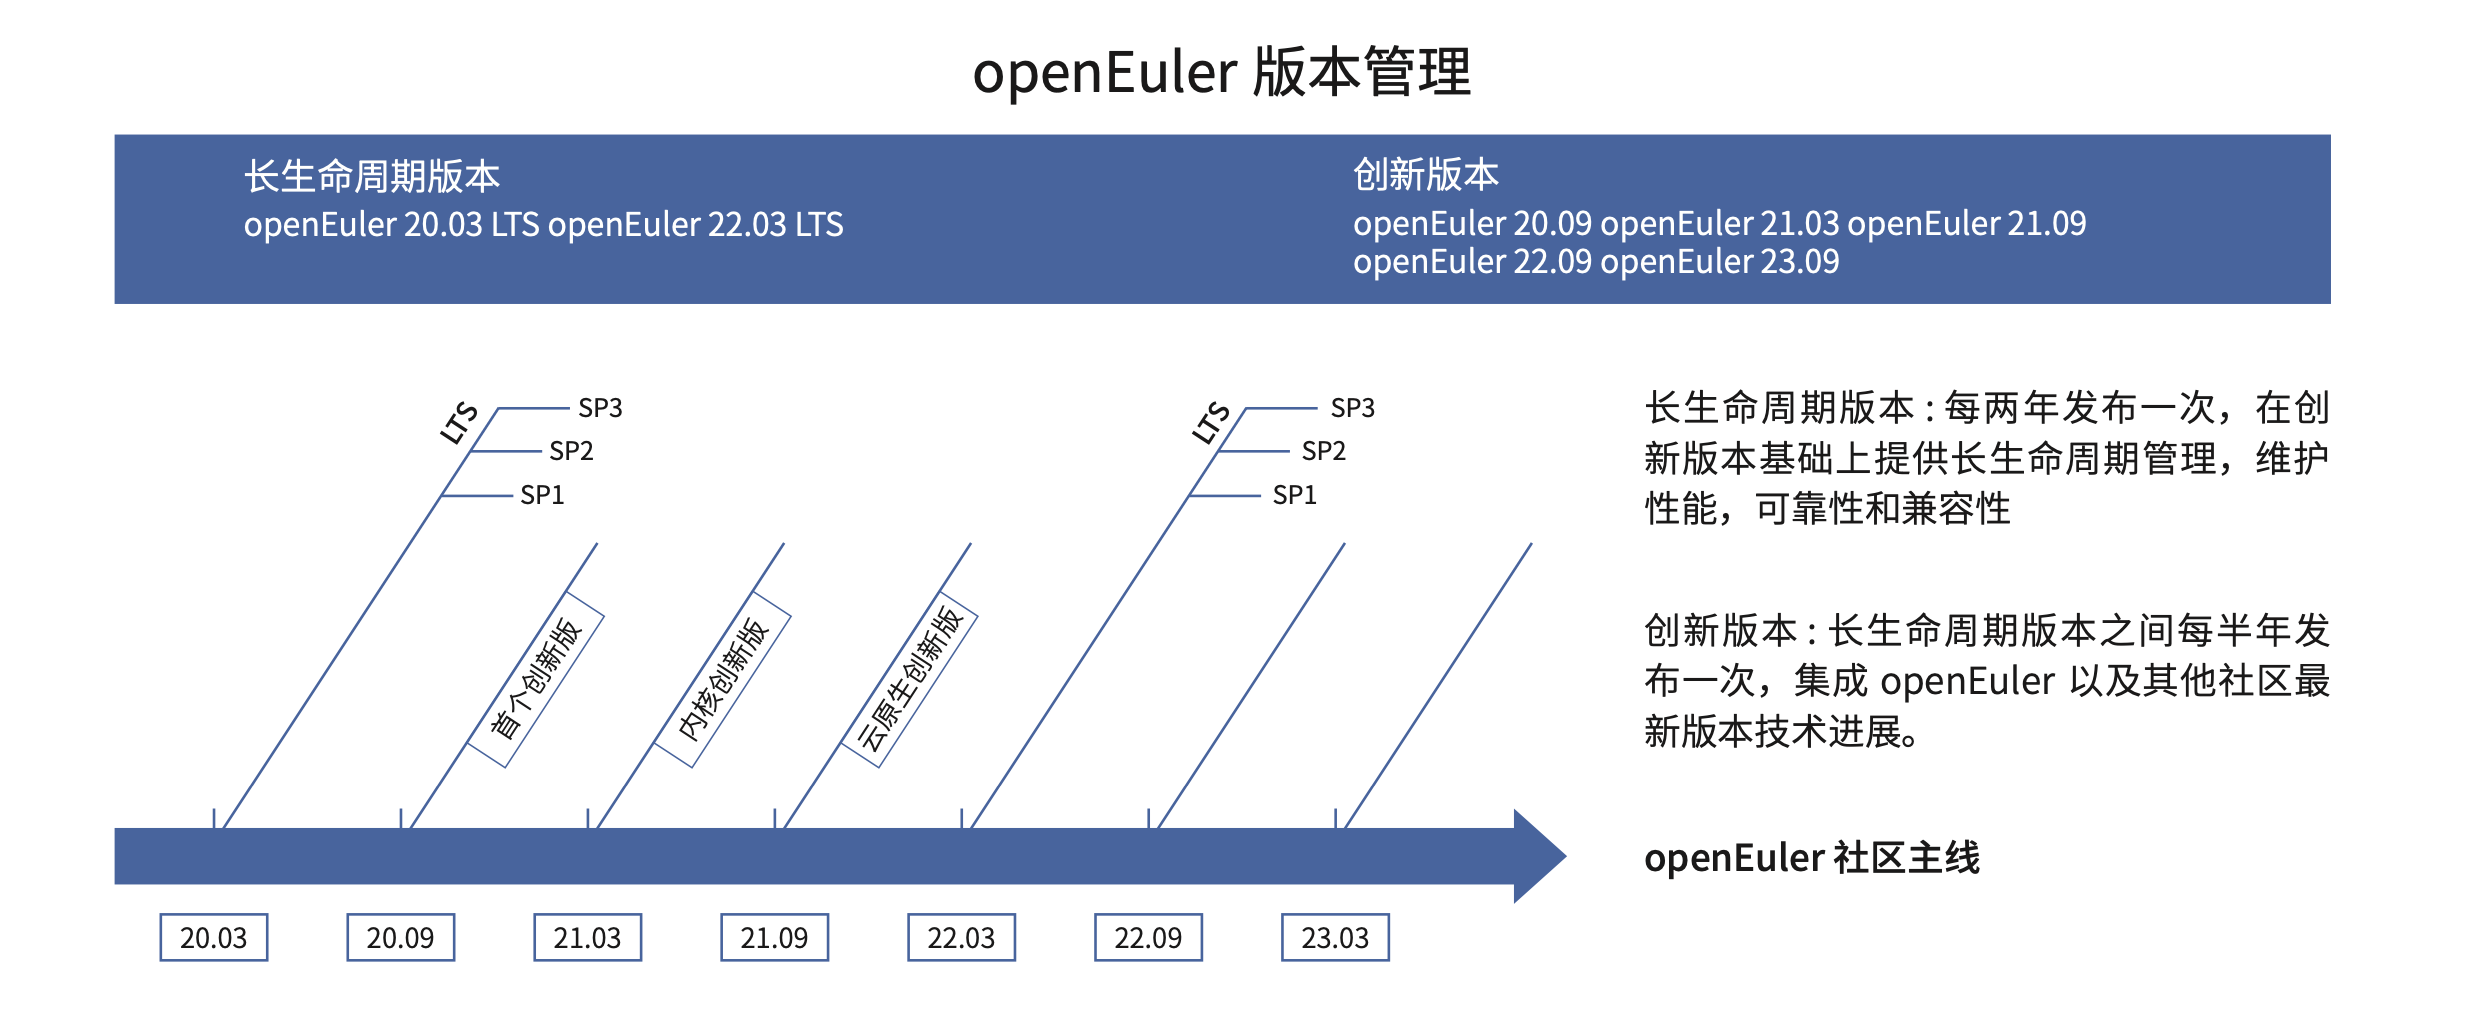
openEuler

  • BCLinux oe22.10 和 oe22.10 都是基于 OpenEuler 的非公开发行版本
  • BCLinux 仅提供 x86_64 和 AArch64 架构,但 openEuler 还提供了 ARM32、RISC-V、LoongArch64、Power 和 SW64 架构。

二、安装方法

本次测试的基准版本是 BCLinux oe21.10 的 x86-64 架构。

1. 准备工作

  1. 通过官方站点https://mirrors.cmecloud.cn/bclinux/oe21.10/ISO/x86_64/release/下载ISO安装盘,有基础版本和全量版本,以及两个后续的补丁版本。
  2. 新建一个虚拟机,挂载ISO安装盘,建议内存至少 1GB,硬盘至少 10GB。
    启动后,根据安装向导提示信息,选择中国上海时区,设置root密码(8位以上,至少3种类型字符)、硬盘分区默认即可,最小化安装方式。
  3. 安装完成后启动虚拟机,如果 console 成功登录即为正常。

2. 环境设置

  1. 虚拟机添加一个 cloudinit 类型的 CDROM 设备,用于后续管理个性化配置数据。
    此时,可以顺便卸载ISO安装盘的 CDROM 设备。

  2. 卸载BCLinux的软件许可,否则执行 YUM 等命令时提示要求购买License。

    1
    rpm -evh `rpm -qa |grep bclinux-license`
  3. 默认安装后网卡尚未启用,需要手动调整。
    在/etc/sysconfig/network-scripts/目录中找到网卡配置文件ifcfg-ens18(注意不是常见的eth0),删除UUID,并设置ONBOOT=yes。

  4. reboot重启虚拟机,此时通过ip a可以发现IP地址已启用,联网成功。

    建议此时将虚拟机转换为模版,再 clone 一个虚拟机用于后续安装,以避免误操作又来一次冗长的安装过程。

3. 基线版本配置

  1. 系统软件安装

    1
    2
    3
    4
    5
    6
    7
    8
    9
    10
    11
    12
    13
    14
    # 关闭Firewalld
    systemctl disable --now firewalld

    # 安装虚拟化软件
    yum install -y acpid cloud-init cloud-utils-growpart qemu-guest-agent
    systemctl enable acpid
    systemctl start qemu-guest-agent

    # 禁用zeroconf(零配置网络服务规范),该协议目的是在系统无法连接DHCP服务的时候,尝试获取类似169.254.0.0的保留IP
    echo "NOZEROCONF=yes" >> /etc/sysconfig/network

    # 防止ssh连接使用dns导致访问过慢
    sed -ri '/UseDNS/{s@#@@;s@\s+.+@ no@}' /etc/ssh/sshd_config
    systemctl restart sshd
    • 系统安装已默认关闭 selinux, 但仍然启用 firewalld 系统服务
    • 系统安装默认使用 NetworkManager,因为 networkd.service 已被默认移除
    • cloud-init 是核心的虚拟机管理软件,acpid 用于控制虚拟机的电源设备以便宿主机执行关机命令,cloud-utils-growpart 用于调整虚拟机的分区设置,qemu-guest-agent 用于虚拟机接受宿主机的命令并反馈结果,后续PVE管理界面可以直接显示IP地址信息。
    • BCLinux 已经预置了 git 、net-tools 等常用工具,但没有yum-utils软件包,而是自带 dnf 管理器 yum-config-manager

    注意:dnf 工具包中reposync 和 createrepo 等命令的参数有所不同!!!

  2. 手工调整cloudinit配置文件/etc/cloud/cloud.cfg
    当前cloud-init的版本是 19.4 ,建议修改以下参数:

    • disable_root:false,即允许直接登录虚拟机(默认不允许 root 登录)
    • ssh_pwauth:1,即允许以 ssh passwod 方式登录(默认只能通过 private key 登录)
    • package-update-upgrade-install:以 # 开始注释该行,即避免安装后自动更新系统软件
    • default-user:以 # 开始注释该段落,默认将创建 openEuler 用户
  3. 虚拟机关机,并在PVE控制台上将其转换为模版templete,母鸡就此完成。
    后续,就可以在 PVE 控制台上配置 Cloud-init 的参数,并 clone 该模版启动小鸡了。

三、注意事项

1. 上层软件栈

好消息!官方软件源已包含了许多常用软件,最新版本信息如下:

  • nginx: 1.16.1
  • python3: 3.7.9
  • docker: 18.09.0
  • docker-compose: 1.22.0
  • openjdk(java): 11.0.12
  • nodejs: v12.22.11
1
2
3
4
5
6
7
8
[root@Copy-of-VM-OpenEular21 yum.repos.d]# docker -v
Docker version 18.09.0, build a8959d5
[root@Copy-of-VM-OpenEular21 yum.repos.d]# docker-compose -v
docker-compose version 1.22.0, build f46880f
[root@Copy-of-VM-OpenEular21 yum.repos.d]# java -version
openjdk version "11.0.12" 2021-07-20
OpenJDK Runtime Environment Bisheng (build 11.0.12+9)
OpenJDK 64-Bit Server VM Bisheng (build 11.0.12+9, mixed mode, sharing)

2. Qemu Guest Agent 系统服务

PVE在安装虚拟机时会见到Qemu GA这个选项,是开启还是关闭呢?

Qemu 代理即 qemu-guest-agent,是一个运行在虚拟机里面的程序 qemu-guest-agent是一个帮助程序,守护程序,它安装在虚拟机中,用于在主机和虚拟机之间交换信息,以及在虚拟机中执行命令。
在Proxmox VE中,qemu代理有以下作用:

  • 正确关闭虚拟机,而不是依赖ACPI命令或Windows策略
  • 在进行备份时冻结来宾文件系统(在Windows上,使用卷影复制服务VSS)
  • 使用 DHCP 时,可以在控制台上直接看到虚机的 IP 地址,省去登录小鸡的命令操作了。。。
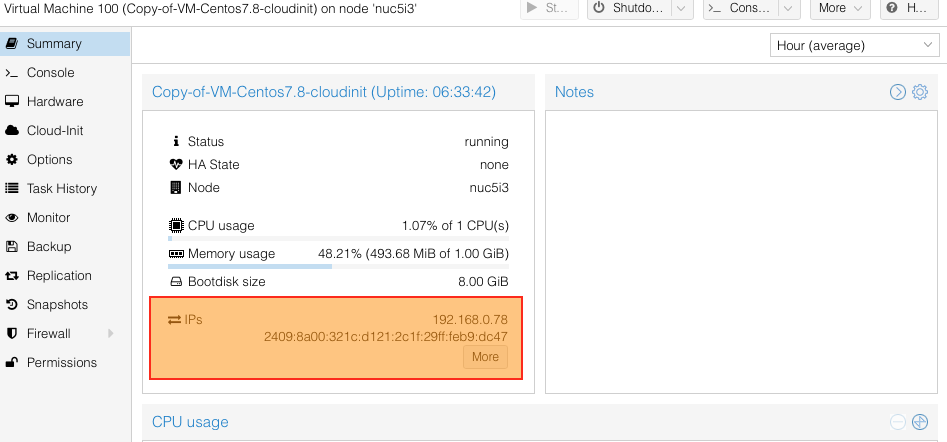
qa
如果想用,不仅需要在pve里开启这个选项,还需要手动安装。

3. Kubernetes集群安装

安装过程参考:K8S 迁移至 openEuler 指导

  1. 安装docker并调整配置文件,当前版本18.09.0

  2. yum安装kubenet组件
    yum install -y kubelet-1.15.10 kubeadm-1.15.10 kubectl-1.15.10 kubernetes-cni-0.7.5

  3. 通过kubeadm config images list获取需要的镜像列表

    1
    2
    3
    4
    5
    6
    7
    k8s.gcr.io/kube-apiserver:v1.15.12
    k8s.gcr.io/kube-controller-manager:v1.15.12
    k8s.gcr.io/kube-scheduler:v1.15.12
    k8s.gcr.io/kube-proxy:v1.15.12
    k8s.gcr.io/pause:3.1
    k8s.gcr.io/etcd:3.3.10
    k8s.gcr.io/coredns:1.3.1
  4. 从gcmirrors/kube-apiserver:v1.15.12等镜像站点获取,再改标签为k8s.gcr.io

  5. 启动安装,注意版本号有区别

    1
    2
    3
    systemctl daemon-reload
    systemctl restart kubelet
    kubeadm init --kubernetes-version v1.15.12 --pod-network-cidr=10.244.0.0/16
  6. 安装并启动calico网络插件

  7. Master节点启动,并逐一启动Worker各个节点


附录一:YUM 官方软件源配置

1
2
3
4
5
6
7
8
9
10
11
12
13
14
15
16
17
18
19
20
21
22
23
24
25
26
27
28
29
30
31
32
33
34
35
36
37
38
39
40
41
42
43
44
[root@MiWiFi-RA70-srv ~]# ls /etc/yum.repos.d
BCLinux.repo

[root@MiWiFi-RA70-srv ~]# more /etc/yum.repos.d/*
# BCLinux-release.repo
#
#
# The mirror system uses the connecting IP address of the client and the
# update status of each mirror to pick mirrors that are updated to and
# geographically close to the client. You should use this for BCLinux updates
# unless you are manually picking other mirrors.
#
# If the mirrorlist= does not work for you, as a fall back you can try the
# remarked out baseurl= line instead.
#
#
[baseos]
name=BC-Linux-release - baseos
baseurl=http://mirrors.bclinux.org/bclinux/oe21.10/OS/$basearch/
gpgcheck=1
enabled=1
gpgkey=file:///etc/pki/rpm-gpg/RPM-GPG-KEY-BCLinux-For-Euler

[everything]
name=BC-Linux-release - everything
baseurl=http://mirrors.bclinux.org/bclinux/oe21.10/everything/$basearch/
gpgcheck=1
enabled=1
gpgkey=file:///etc/pki/rpm-gpg/RPM-GPG-KEY-BCLinux-For-Euler


[update]
name=BC-Linux-release - update
baseurl=http://mirrors.bclinux.org/bclinux/oe21.10/update/$basearch/
gpgcheck=1
enabled=1
gpgkey=file:///etc/pki/rpm-gpg/RPM-GPG-KEY-BCLinux-For-Euler

[extras]
name=BC-Linux-release - extras
baseurl=http://mirrors.bclinux.org/bclinux/oe21.10/extras/$basearch/
gpgcheck=1
enabled=1
gpgkey=file:///etc/pki/rpm-gpg/RPM-GPG-KEY-BCLinux-For-Euler

附录二:cloudinit 的原始配置

1
2
3
4
5
6
7
8
9
10
11
12
13
14
15
16
17
18
19
20
21
22
23
24
25
26
27
28
29
30
31
32
33
34
35
36
37
38
39
40
41
42
43
44
45
46
47
48
49
50
51
52
53
54
55
56
57
58
59
60
61
62
63
64
65
66
67
68
69
70
71
72
73
74
75
76
77
78
79
80
81
82
83
84
85
86
87
88
89
90
91
92
93
94
95
[root@MiWiFi-RA70-srv ~]# cat /etc/cloud/cloud.cfg
# The top level settings are used as module
# and system configuration.

# A set of users which may be applied and/or used by various modules
# when a 'default' entry is found it will reference the 'default_user'
# from the distro configuration specified below
users:
- default

# If this is set, 'root' will not be able to ssh in and they
# will get a message to login instead as the default $user
disable_root: true

mount_default_fields: [~, ~, 'auto', 'defaults,nofail', '0', '2']
resize_rootfs_tmp: /dev
ssh_pwauth: 0

# This will cause the set+update hostname module to not operate (if true)
preserve_hostname: false

# Example datasource config
# datasource:
# Ec2:
# metadata_urls: [ 'blah.com' ]
# timeout: 5 # (defaults to 50 seconds)
# max_wait: 10 # (defaults to 120 seconds)

# The modules that run in the 'init' stage
cloud_init_modules:
- migrator
- seed_random
- bootcmd
- write-files
- growpart
- resizefs
- disk_setup
- mounts
- set_hostname
- update_hostname
- update_etc_hosts
- ca-certs
- rsyslog
- users-groups
- ssh

# The modules that run in the 'config' stage
cloud_config_modules:
- ssh-import-id
- locale
- set-passwords
- spacewalk
- yum-add-repo
- ntp
- timezone
- disable-ec2-metadata
- runcmd

# The modules that run in the 'final' stage
cloud_final_modules:
- package-update-upgrade-install
- puppet
- chef
- mcollective
- salt-minion
- rightscale_userdata
- scripts-vendor
- scripts-per-once
- scripts-per-boot
- scripts-per-instance
- scripts-user
- ssh-authkey-fingerprints
- keys-to-console
- phone-home
- final-message
- power-state-change

# System and/or distro specific settings
# (not accessible to handlers/transforms)
system_info:
# This will affect which distro class gets used
distro: openEuler
# Default user name + that default users groups (if added/used)
default_user:
name: openEuler
lock_passwd: True
gecos: openEuler Cloud User
groups: [wheel, adm, systemd-journal]
sudo: ["ALL=(ALL) NOPASSWD:ALL"]
shell: /bin/bash
# Other config here will be given to the distro class and/or path classes
paths:
cloud_dir: /var/lib/cloud/
templates_dir: /etc/cloud/templates/
ssh_svcname: sshd

参考文献